0.简介

前面的文章我们创建了很多微服务,每个微服务都需要自己的配置才能运行,每个服务都有自己配置文件,微服务多了配置文件就多了,如果要修改某一个参数,就需要修改多个微服务的配置文件。为了解决这个问题,Spring Cloud提供了一个解决方案就是使用spring cloud config分布式配置中心来做到一处修改,处处运行。
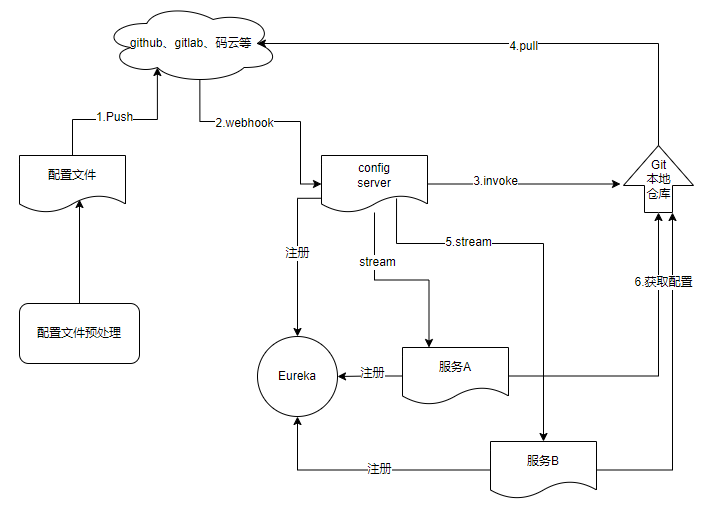
整个流程可以分成三大步骤:
(1)首先搭建一个远程仓库(github、gitlab、码云都行,本文使用码云做演示),然后创建一个项目,命名为spring-cloud-config (名称无所谓),然后把这个仓库克隆到本地。
(2)然后搭建配置中心的服务端
(3)最后搭建配置中心的客户端
官方文档:https://docs.spring.io/spring-cloud-config/docs/current/reference/html/
(注:后面可以用nacos代替,nacos=spring cloud eureka+spring cloud config + spring cloud bus)
1.搭建远程仓库
我们打开码云,创建一个仓库。
注意,仓库最好设置成公开,如果设置成私有,下面的配置信息需要加上仓库的用户名和密码。

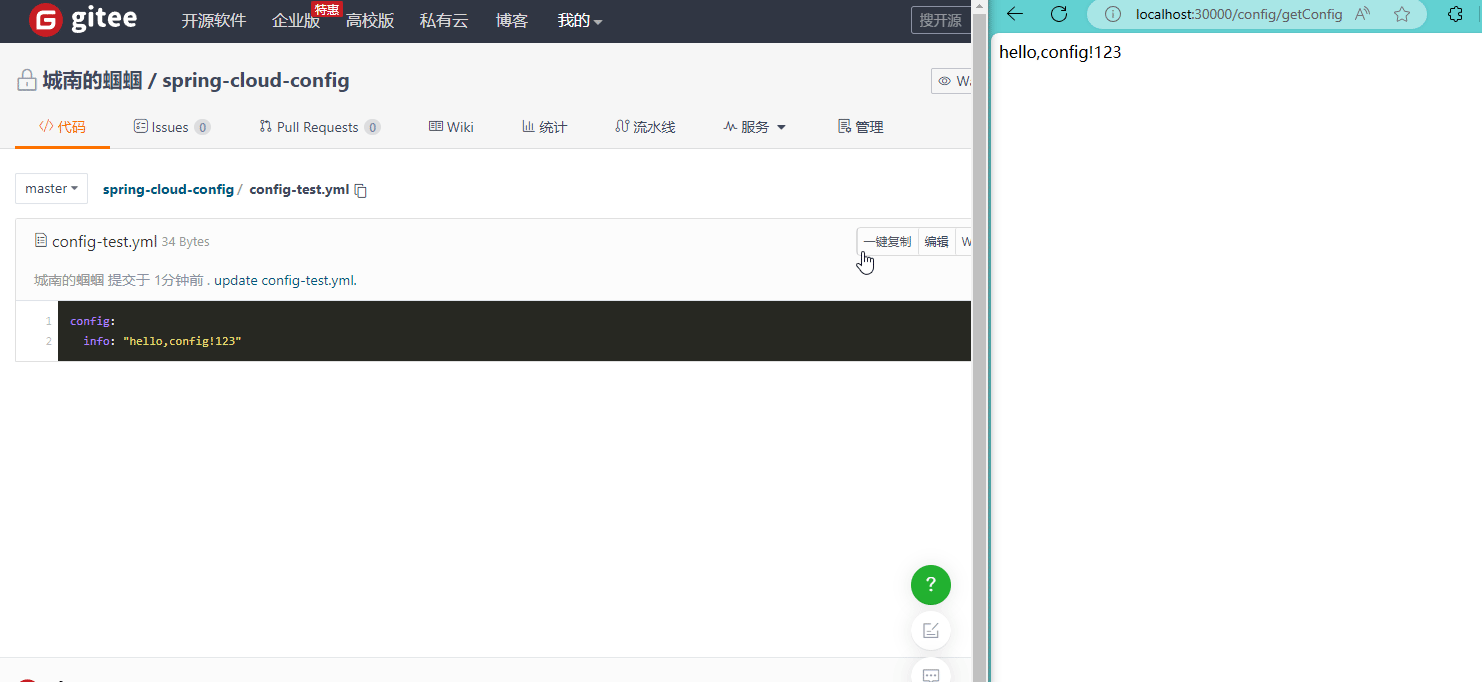
然后把仓库克隆到本地,然后我们创建一个测试文件,里面放置一个简单文件如下:
config:
  info: "hello,config!"
并命名为:config-test.yml。然后把这个文件上传到到码云上。
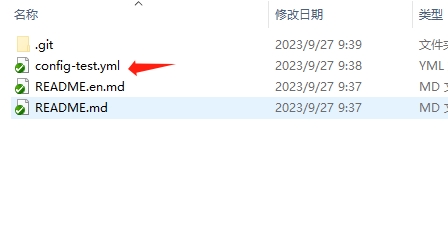
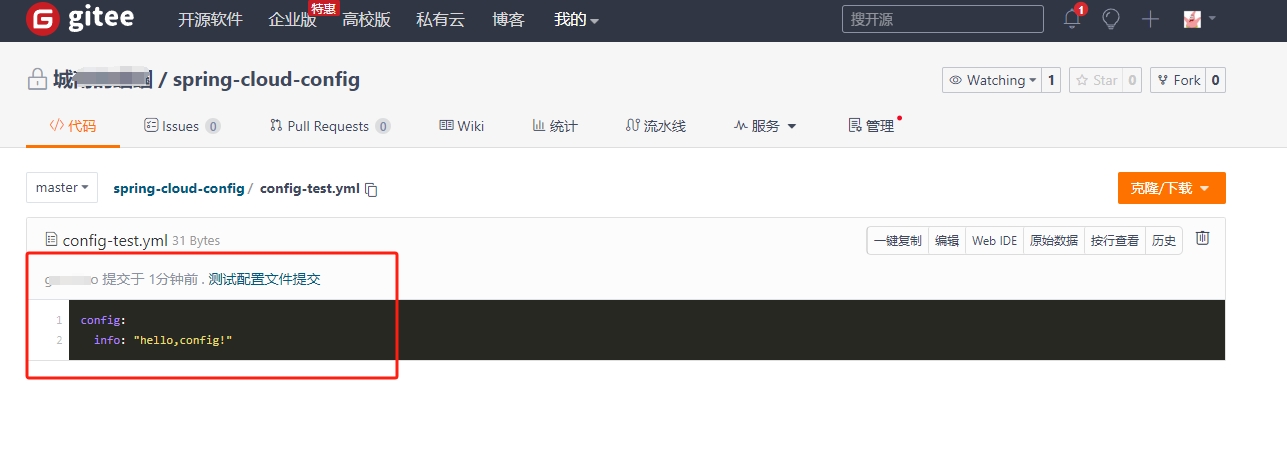
这样git仓库部分就搭建完毕了,后期可以往仓库里添加其他配置文件了。
注意: 统一配置中心服务端 config Server 读取远程仓储的配置的时候是有一定的规则,因此在远程仓储中的配置文件命名也要有一定的规则。
远程仓库配置文件命名规则:
{application}-{profile}.yml/{application}-{profile}.properties
config server 读取远程仓库的配置规则:
/{application}/{profile}[/{label}]
/{application}-{profile}.yml
/{label}/{application}-{profile}.yml
/{application}-{profile}.properties
/{label}/{application}-{profile}.properties
其中,label代表的是分支,profile代表的是环境。
2.搭建配置服务中心服务端
我们参考前面的文章, 创建一个module,
POM文件如下:
<?xml version="1.0" encoding="UTF-8"?>
<project xmlns="http://maven.apache.org/POM/4.0.0"
         xmlns:xsi="http://www.w3.org/2001/XMLSchema-instance"
         xsi:schemaLocation="http://maven.apache.org/POM/4.0.0 http://maven.apache.org/xsd/maven-4.0.0.xsd">
    <parent>
        <artifactId>s-cloud</artifactId>
        <groupId>site.longkui</groupId>
        <version>0.0.1-SNAPSHOT</version>
    </parent>
    <modelVersion>4.0.0</modelVersion>

    <artifactId>s-cloud-config</artifactId>


    <dependencies>
        <!-- spring boot -->
        <dependency>
            <groupId>org.springframework.boot</groupId>
            <artifactId>spring-boot-starter-web</artifactId>
        </dependency>
        <!-- 添加统一服务配置中心 config-->
        <dependency>
            <groupId>org.springframework.cloud</groupId>
            <artifactId>spring-cloud-config-server</artifactId>
            <version>3.1.8</version>
        </dependency>
        <!--eureka 客户端-->
        <dependency>
            <groupId>org.springframework.cloud</groupId>
            <artifactId>spring-cloud-starter-netflix-eureka-client</artifactId>
            <version>3.1.8-SNAPSHOT</version>
        </dependency>

    </dependencies>
</project>
配置文件application.yml参考如下(这里增加了git的配置):
server:
  port: 20000  #服务的端口
#spring相关配置
spring:
  application:
    name: service-config  #服务的名称
  cloud:
    config:
      server:
        git:
          #  username: xxxxx
          #  password: xxxxx
          skip-ssl-validation: true  #跳过ssl认证
          uri: https://gitee.com/guo1635/spring-cloud-config.git #要读取的远程仓库的配置文件的地址。
          default-label: master # 指定分支,不指定则默认master

#eureka配置
eureka:
  client:
    service-url:
      # 填写注册中心服务器地址
      defaultZone: http://localhost:7001/eureka
    # 是否需要将自己注册到注册中心
    register-with-eureka: true
    # 是否需要搜索服务信息
    fetch-registry: true
  instance:
    # 使用ip地址注册到注册中心
    prefer-ip-address: true
    # 注册中心列表中显示的状态参数
    instance-id: ${spring.cloud.client.ip-address}:${server.port}
创建启动类参考如下,注意,这里加入了@EnableConfigServer 注解,表示spring-cloud-config的服务端
package site.longkui.scloudconfig;

import org.springframework.boot.SpringApplication;
import org.springframework.boot.autoconfigure.SpringBootApplication;
import org.springframework.cloud.config.server.EnableConfigServer;
import org.springframework.cloud.netflix.eureka.EnableEurekaClient;

@SpringBootApplication
@EnableEurekaClient//  eureka 客户端
@EnableConfigServer//  config 服务端
public class sCloudConfig {
    public static void main(String[] args) {
        SpringApplication.run(sCloudConfig.class, args);
    }
}
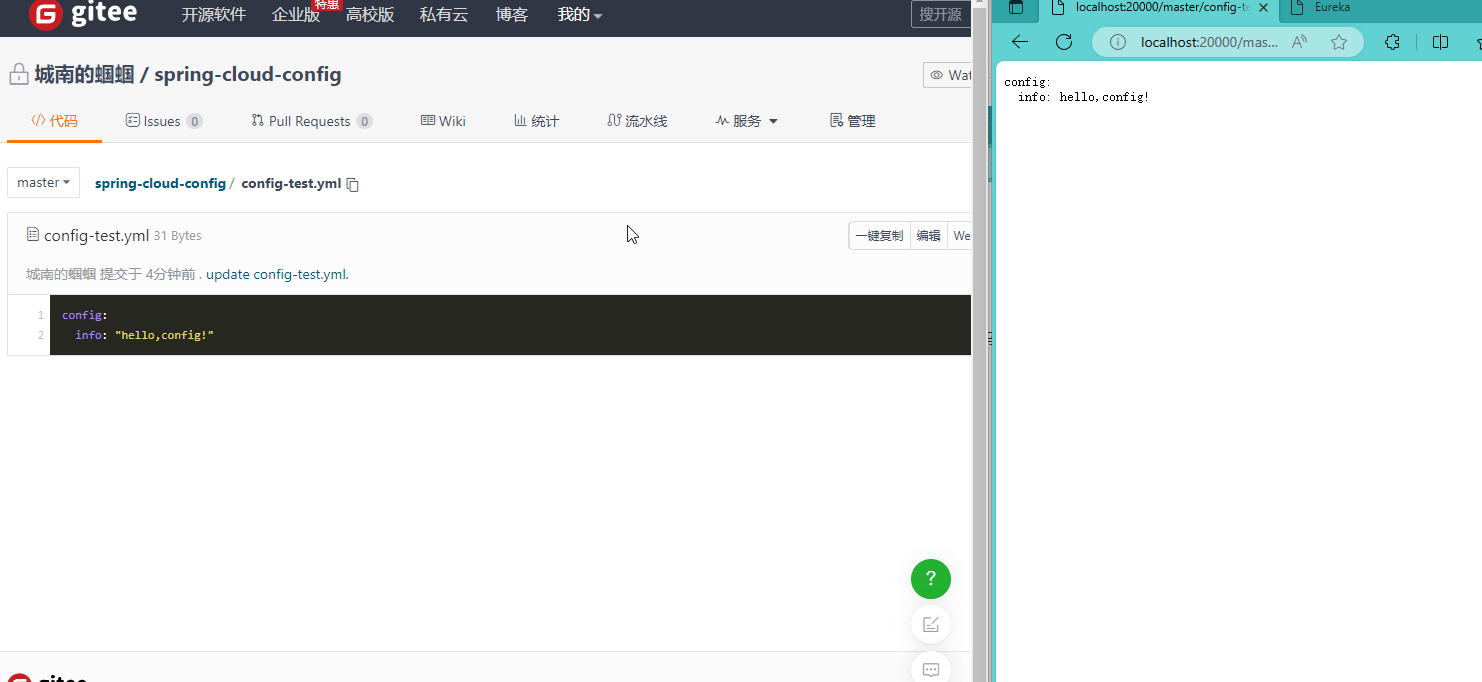
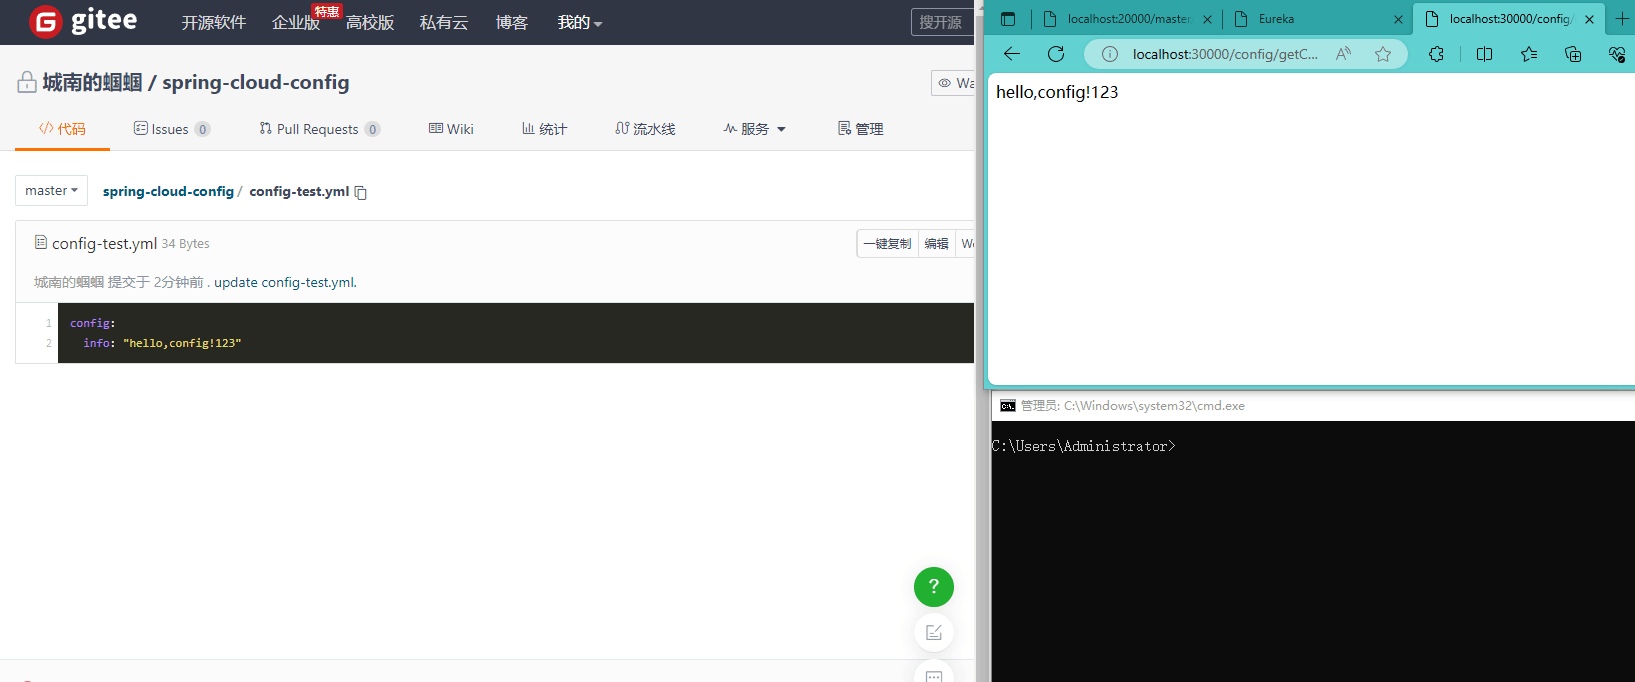
然后我们访问我们的测试文件的地址:
http://localhost:20000/master/config-test.yml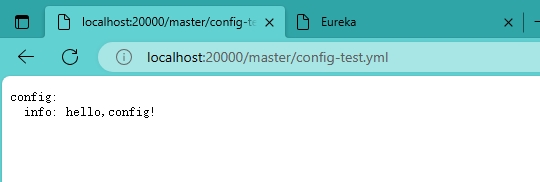
可以看到,正常获取我们创建的测试配置文件。我们修改码云上的配置文件后,刷新后也可以得到最新的配置信息。
3.搭建配置服务中心客户端
客户端的POM文件参考如下:
<?xml version="1.0" encoding="UTF-8"?>
<project xmlns="http://maven.apache.org/POM/4.0.0"
         xmlns:xsi="http://www.w3.org/2001/XMLSchema-instance"
         xsi:schemaLocation="http://maven.apache.org/POM/4.0.0 http://maven.apache.org/xsd/maven-4.0.0.xsd">
    <parent>
        <artifactId>s-cloud</artifactId>
        <groupId>site.longkui</groupId>
        <version>0.0.1-SNAPSHOT</version>
    </parent>
    <modelVersion>4.0.0</modelVersion>

    <artifactId>s-cloud-config-clinent</artifactId>

    <dependencies>
        <!-- spring boot -->
        <dependency>
            <groupId>org.springframework.boot</groupId>
            <artifactId>spring-boot-starter-web</artifactId>
        </dependency>
        <!-- config -->
        <dependency>
            <groupId>org.springframework.cloud</groupId>
            <artifactId>spring-cloud-starter-config</artifactId>
            <version>3.1.8</version>
        </dependency>
        <!--eureka 客户端-->
        <dependency>
            <groupId>org.springframework.cloud</groupId>
            <artifactId>spring-cloud-starter-netflix-eureka-client</artifactId>
            <version>3.1.8-SNAPSHOT</version>
        </dependency>
        <!-- 新版本的springcloud不支持bootstrap.yml,需要引入下面的依赖       -->
        <dependency>
            <groupId>org.springframework.cloud</groupId>
            <artifactId>spring-cloud-starter-bootstrap</artifactId>
            <version>3.1.7</version>
        </dependency>
    </dependencies>

</project>
新建配置文件,bootstrap.yml,详细原因可以看:https://www.longkui.site/program/java/application-bootstrap/5060/
简单来说就是bootstrap.yml的优先级比application.yml优先级高。
server:
  port: 30000  #服务的端口
#spring相关配置
spring:
  application:
    name: service-config-client  #服务的名称
  cloud:
    #Config客户端配置
    config:
      label: master #分支名称
      name: config #配置文件名称
      profile: test #读取后缀名称
      uri: http://127.0.0.1:20000 #配置中心地址


#eureka配置
eureka:
  client:
    service-url:
      # 填写注册中心服务器地址
      defaultZone: http://localhost:7001/eureka
    # 是否需要将自己注册到注册中心
    register-with-eureka: true
    # 是否需要搜索服务信息
    fetch-registry: true
  instance:
    # 使用ip地址注册到注册中心
    prefer-ip-address: true
    # 注册中心列表中显示的状态参数
    instance-id: ${spring.cloud.client.ip-address}:${server.port}
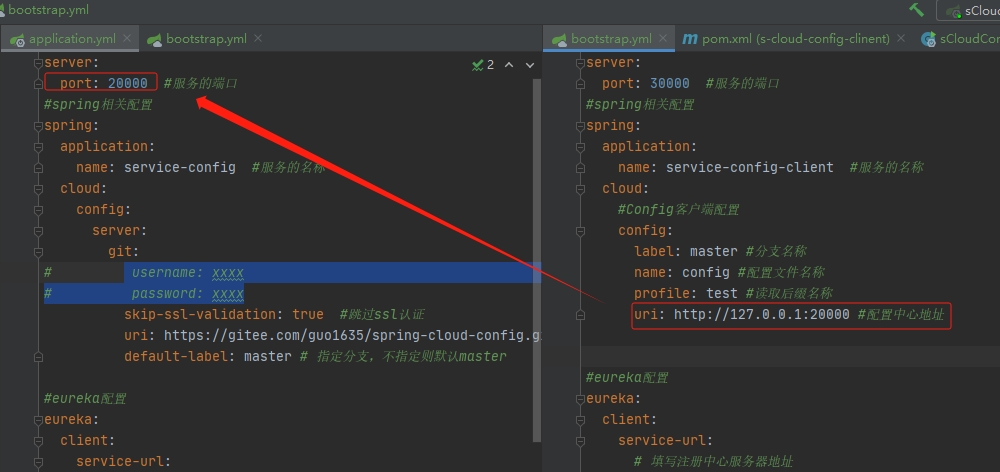
我们配置测试配置文件config-test.yml,这里的name对应的是文件名的前面部分,profile对应的是后面部分。
注意,上面这里用的IP地址+端口的方式进行的访问,实际操作中,更多的是用服务的方式进行访问,参考如下:
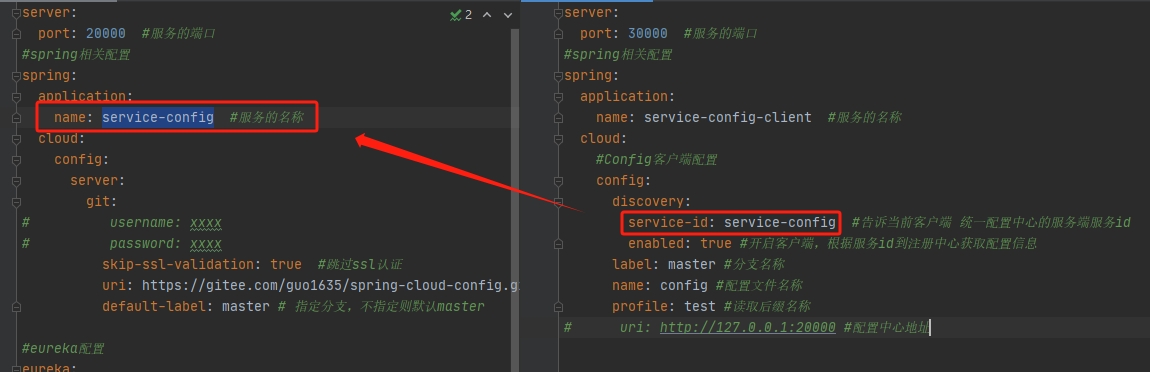
server:
  port: 30000  #服务的端口
#spring相关配置
spring:
  application:
    name: service-config-client  #服务的名称
  cloud:
    #Config客户端配置
    config:
      discovery:
        service-id: service-config  #告诉当前客户端 统一配置中心的服务端服务id
        enabled: true #开启客户端,根据服务id到注册中心获取配置信息
      label: master #分支名称
      name: config #配置文件名称
      profile: test #读取后缀名称
#      uri: http://127.0.0.1:20000 #配置中心地址


#eureka配置
eureka:
  client:
    service-url:
      # 填写注册中心服务器地址
      defaultZone: http://localhost:7001/eureka
    # 是否需要将自己注册到注册中心
    register-with-eureka: true
    # 是否需要搜索服务信息
    fetch-registry: true
  instance:
    # 使用ip地址注册到注册中心
    prefer-ip-address: true
    # 注册中心列表中显示的状态参数
    instance-id: ${spring.cloud.client.ip-address}:${server.port}
创建启动类:
package site.longkui.scloudconfigclient;

import org.springframework.boot.SpringApplication;
import org.springframework.boot.autoconfigure.SpringBootApplication;
import org.springframework.cloud.netflix.eureka.EnableEurekaClient;


@SpringBootApplication
@EnableEurekaClient//  eureka 客户端
public class sCloudConfigClient {
    public static void main(String[] args) {
        SpringApplication.run(sCloudConfigClient.class, args);
    }
}
创建controller
package site.longkui.scloudconfigclient.controller;


import org.springframework.beans.factory.annotation.Value;
import org.springframework.web.bind.annotation.GetMapping;
import org.springframework.web.bind.annotation.RequestMapping;
import org.springframework.web.bind.annotation.RestController;

@RestController
@RequestMapping("/config")
public class ConfigClientController {

    @Value("${config.info}")
    private String info;

    @GetMapping("/getConfig")
    public String getConfig(){
        return info;
    }

}
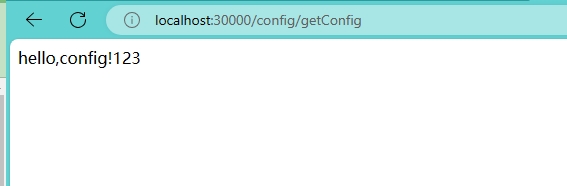
然后启动模块,访问我们的接口,可以看到,能够正确读取配置内容。
4.客户端手动刷新
客户端需要动态刷新的原因,请看下图:
我们修改了配置,不能立即在客户端生效,需要重新启动才能生效。
我们可以通过手动刷新和自动刷新来解决这个问题。
我们在客户端添加一个依赖
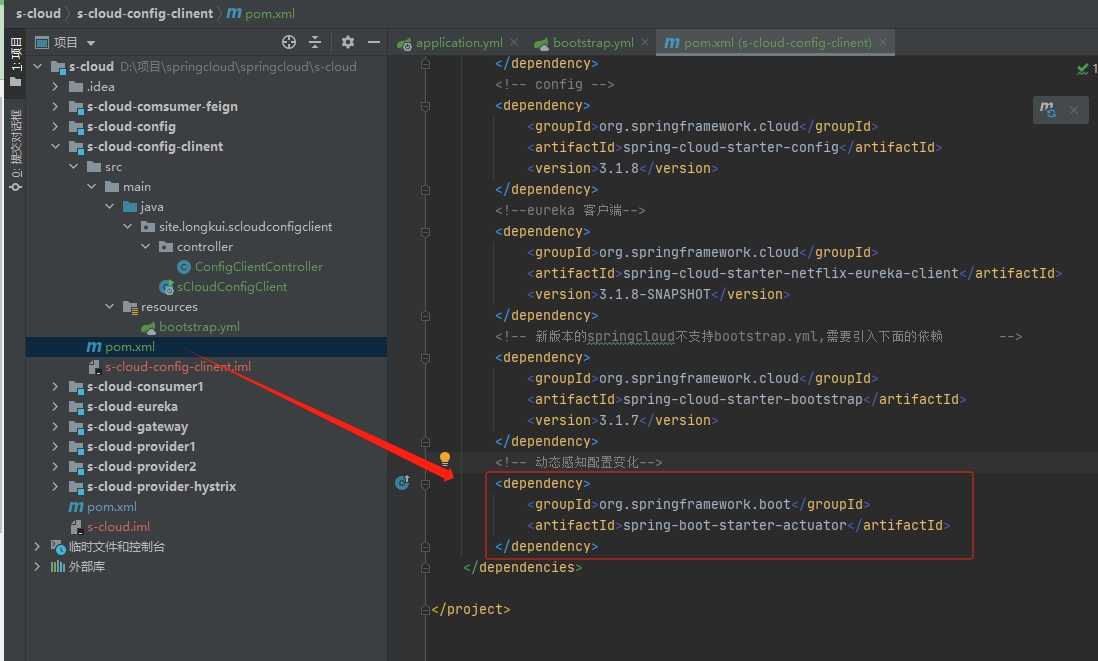
 <!-- 动态感知配置变化-->
        <dependency>
            <groupId>org.springframework.boot</groupId>
            <artifactId>spring-boot-starter-actuator</artifactId>
        </dependency>
对外暴露服务端点,让客户端可以接受到配置的更新,我们修改客户端的bootstrap.yml
#暴露服务端点,让客户端能感受到配置的更新
management:
  endpoints:
    web:
      exposure:
        include: "*"
然后在controller中加入@RefeshScope
package site.longkui.scloudconfigclient.controller;


import org.springframework.beans.factory.annotation.Value;
import org.springframework.cloud.context.config.annotation.RefreshScope;
import org.springframework.web.bind.annotation.GetMapping;
import org.springframework.web.bind.annotation.RequestMapping;
import org.springframework.web.bind.annotation.RestController;

@RestController
@RequestMapping("/config")
@RefreshScope
public class ConfigClientController {

    @Value("${config.info}")
    private String info;

    @GetMapping("/getConfig")
    public String getConfig(){
        return info;
    }

}
然后重启模块,此时修改配置后,需要在CMD中访问以下地址。
curl -X POST "http://127.0.0.1:30000/actuator/refresh然后再访问客户端就可以手动刷新了。
自动刷新将在下一篇bus消息总线进行介绍。