0.前言
上一篇文章中简单介绍了angular中的默认路由,以及访问的方式,这篇文章继续介绍,我们一般可以通过哪些方式来经过路由访问页面。
用户除了通过直接访问URL链接之外,还有其他访问页面的方式。
1.通过路由链接(routerLink)
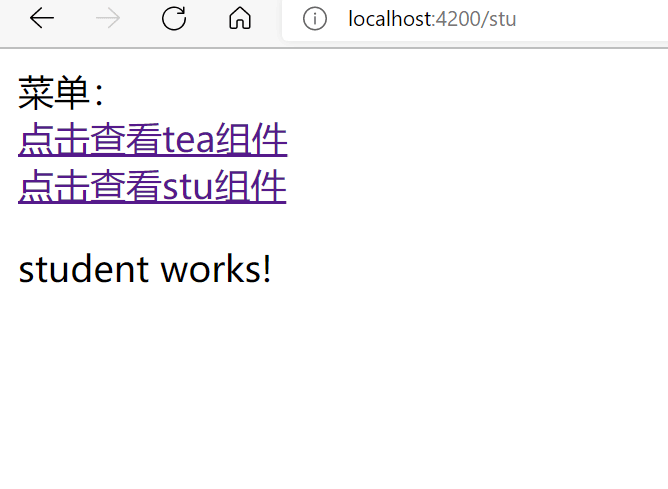
路由链接类似于超链接一样,直接写在HTML页面。比如像下面这样,直接在app.component.html中写下面这样的代码:
<div>
  菜单:
  <nav>
    <a routerLink="/tea">点击查看tea组件</a>
    <br>
    <a routerLink="/stu">点击查看stu组件</a>
    <br>
    <!-- 也可以用下面的这种形式 -->
    <!-- <a [routerLink]="['/tea']">点击查看stu组件</a> -->
  </nav>
</div>
<router-outlet></router-outlet>
效果图:
2.路由传参
我们可以通过路由传参。
通过这种方式进行传参,可以设想以下使用情景:
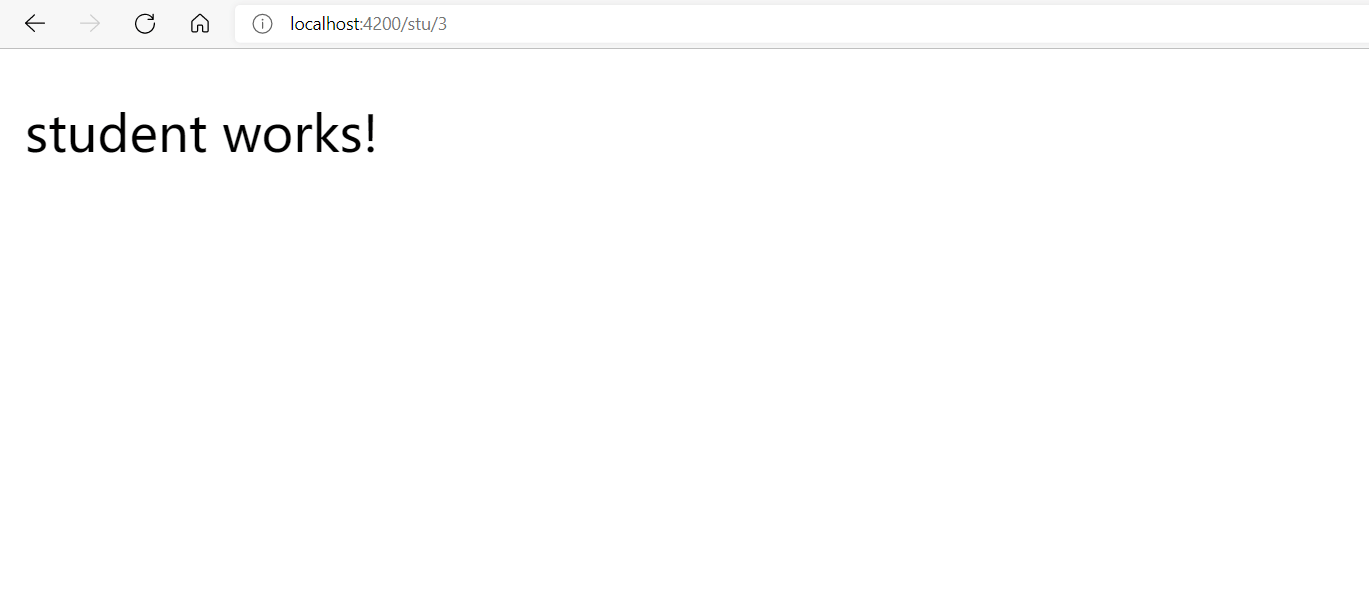
通过访问 localhost:4200/stu/1 或者localhost:4200/stu/2 查看不同文章(作品)
那么我们可以把上一篇文章中的app-routing.module.ts中的路由改下下面样子:
const routes: Routes = [
  {path:"tea",component:TeacherComponent},
  {path:"stu/:id",component:StudentComponent}
];
这种表示我们需要stu这个路由传递一个参数,id。用这个id来区分不同的文章等。
我们在StudentComponent这个组件如下填写
import { Component, OnInit } from '@angular/core';
import {ActivatedRoute} from "@angular/router";
@Component({
  selector: 'app-student',
  templateUrl: './student.component.html',
  styleUrls: ['./student.component.css']
})
export class StudentComponent implements OnInit {

  constructor(     private routeInfo: ActivatedRoute,) { }
  ngOnInit(){
    let id = this.routeInfo.snapshot.params["id"];
    alert(id)
    console.log(id)
  }

}
就可以看到下面这样的效果。可以看到,我们通过路由拿到了id。拿到id之后就可以干很多事了,比如根据这个id,决定显示哪篇文章。
注:遇到一个小问题,就是console.log在这里不会输出,但是alert正常显示,目前不知道什么原因。
除了上面那种写法以外,我们可以直接使用路由参数里面的data属性来进行传参,比如下面这样:
const routes: Routes = [
  {path:"tea",component:TeacherComponent},
  {path:"stu",component:StudentComponent,data:{type:'year'}}
];
上面这段代码表示传递的参数中有个type属性,值是year。那么如何取出这个属性呢?
import { Component, OnInit } from '@angular/core';
import {ActivatedRoute} from "@angular/router";
@Component({
  selector: 'app-student',
  templateUrl: './student.component.html',
  styleUrls: ['./student.component.css']
})
export class StudentComponent implements OnInit {

  constructor(     private routeInfo: ActivatedRoute,) { }
  ngOnInit(){
    let type= this.routeInfo.snapshot.data["type"]
    alert(type)
    console.log(type)
  }

}
3.JS路由跳转
除了通过上面的route的方式传参,我们还可以通过JS的路由跳转。
首先导入
import { Router } from '@angular/router';//引入
然后,注入到构造函数中:
constructor( private router: Router) { }//注入到构造函数
比如,我们在某个页面中写了一个button,button后绑定的是
this.router.navigate(['stu']);
或者
this.router.navigate(['stu', id]);
这样就可以跳转和传参了。
当然,如果你要传递多个参数,可以这样;
this.router.navigate(['stu'], {queryParams: {id: '1',name: 'zhangsan'}
4.绝对路由
this.router.navigateByUrl('home');
navigateByUrl()和navigate()的区别点是:navigateByUrl不是根据参数来确定路由地址的。
5.读取路由参数的一些方式
方法1:
 this.route.queryParams.subscribe(queryParams => {
        let productId = queryParams.productId;
        let title = queryParams.title;
    });
方法2:
  public params;  //公有变量
  ngOnInit() {
    this.getData();
  }
  getData() {
     this.route.params.subscribe(
       params => {
          this.params = params;
          console.log(this.params);
       }
    );
  }
方法3:
ngOnInit(): void {
  this.getData();
}

getData(): void {
  const id = +this.route.snapshot.paramMap.get('id');
  console.log(id);
}
注意:上面的方法并不是所有的都能自由搭配。比如,我用了
this.router.navigate([‘stu’, id]);
那么我在stu的ngOnInit中可以这样取值:
     this.route.params.subscribe(
       params => {
          console.log(params);
       }
    );